Tiếp theo bài viết hướng dẫn cài đặt VNC Server trên Ubuntu, hôm nay mình sẽ hướng dẫn các bạn cách cài đặt và kết nối VNC Server trên CentOS.
Bạn cần cài đặt với user có quyền root.
1. Cài đặt VNC Server
Cài đặt VNC Server package tigervnc-server và giao diện đồ họa GNOME Desktop. Ngoài ra, bạn có thể sử dụng các giao diện đồ họa khác như KDE hay XFCE-4.4.
# yum install tigervnc-server
## CentOS 6
 # yum groupinstall "Desktop"

 ## CentOS 7
 # yum groupinstall "GNOME Desktop"
2. Cấu hình VNC Server
2.1. Thiết lập tài khoản truy cập VNC
Để bảo mật, mình sẽ thiết lập truy cập qua VNC bằng user root và hocvps. Trong đó:
- User root truy cập qua
domain:1với tất cả các quyền. - User hocvps truy cập qua
domain:2
_ Tạo mới user hocvps: # adduser hocvps
_ Thiết lập mật khẩu khi truy cập VNC bằng user root, lưu tại /root/.vnc/passwd
# vncpasswd
_ Thiết lập mật khẩu khi truy cập VNC bằng user hocvps, lưu tại /home/hocvps/.vnc/passwd
# su hocvps
 # vncpasswd
 # exit
2.2. Chỉnh sửa cấu hình VNC
2.2.1. Đối với CentOS 6
_ Thiết lập cấu hình truy cập VNC:
Đối với CentOS 6, file cấu hình tại /etc/sysconfig/vncservers. Thêm đoạn sau vào cuối:
VNCSERVERS="1:root 2:hocvps"
 VNCSERVERARGS[1]="-geometry 1024x768"
 VNCSERVERARGS[2]="-geometry 1024x768"
Trong đó, dòng đầu tiên là quy định user kết nối và port tương ứng, dòng tiếp theo quy định độ phân giải màn hình.
_ Mở port truy cập:
Mở port 590X tương ứng với port X truy cập của VNC Client, cụ thể port 5901, 5902.
# iptables -I INPUT -p tcp --dport 5901:5902 -j ACCEPT
 # service iptables save
_ Thiết lập VNC Server luôn khởi động cùng server:
# chkconfig vncserver on
_ Cuối cùng, khởi động VNC Server:
# service vncserver start
 Starting VNC server: 1:root xauth:  file /root/.Xauthority does not exist

 New 'vultr.guest:1 (root)' desktop is vultr.guest:1

 Creating default startup script /root/.vnc/xstartup
 Starting applications specified in /root/.vnc/xstartup
 Log file is /root/.vnc/vultr.guest:1.log

 2:hocvps xauth:  file /home/hocvps/.Xauthority does not exist

 New 'vultr.guest:2 (hocvps)' desktop is vultr.guest:2

 Creating default startup script /home/hocvps/.vnc/xstartup
 Starting applications specified in /home/hocvps/.vnc/xstartup
 Log file is /home/hocvps/.vnc/vultr.guest:2.log
                                                            [  OK  ]
2.2.2. Đối với CentOS 7
_ Thiết lập cấu hình truy cập VNC:
Đối với CentOS 7, cấu hình VNC tại /lib/systemd/system/[email protected].
Bạn cần tạo mới và chỉnh sửa cấu hình cho từng user theo cấu hình gốc, lưu tại /etc/systemd/system/
# cp /lib/systemd/system/[email protected] /etc/systemd/system/vncserver@:1.service
 # cp /lib/systemd/system/[email protected] /etc/systemd/system/vncserver@:2.service
Thay đổi USER tại dòng ExecStart và PIDFiletrong block cuối [Service], cụ thể:
Cấu hình /etc/systemd/system/vncserver@:1.service cho user root:
# nano /etc/systemd/system/vncserver@:1.service
[Service]
 Type=forking
 # Clean any existing files in /tmp/.X11-unix environment
 ExecStartPre=/bin/sh -c '/usr/bin/vncserver -kill %i > /dev/null 2>&1 || :'
 ExecStart=/usr/sbin/runuser -l root -c "/usr/bin/vncserver %i"
 PIDFile=/root/.vnc/%H%i.pid
 ExecStop=/bin/sh -c '/usr/bin/vncserver -kill %i > /dev/null 2>&1 || :'

 [Install]
 WantedBy=multi-user.target
Cấu hình /etc/systemd/system/vncserver@:2.service cho user hocvps:
# nano /etc/systemd/system/vncserver@:2.service
[Service]
 Type=forking
 # Clean any existing files in /tmp/.X11-unix environment
 ExecStartPre=/bin/sh -c '/usr/bin/vncserver -kill %i > /dev/null 2>&1 || :'
 ExecStart=/usr/sbin/runuser -l hocvps -c "/usr/bin/vncserver %i"
 PIDFile=/home/hocvps/.vnc/%H%i.pid
 ExecStop=/bin/sh -c '/usr/bin/vncserver -kill %i > /dev/null 2>&1 || :'

 [Install]
 WantedBy=multi-user.target
_ Thiết lập firewall:
# firewall-cmd --permanent --zone=public --add-service vnc-server
 success
 # firewall-cmd --reload
 success
_ Thiết lập khởi động cùng server:
# systemctl daemon-reload
 # systemctl enable vncserver@:1.service
 Created symlink from /etc/systemd/system/multi-user.target.wants/vncserver@:1.service to /etc/systemd/system/vncserver@:1.service.
 # systemctl enable vncserver@:2.service
 Created symlink from /etc/systemd/system/multi-user.target.wants/vncserver@:2.service to /etc/systemd/system/vncserver@:2.service.
 # systemctl start vncserver@:1.service
 # systemctl start vncserver@:2.service
_ Cuối cùng, khởi động VNC Server:
Khởi động VNC Server cho user root:
# vncserver
Khởi động VNC Server cho user hocvps:
# su hocvps
 # vncserver
 # exit
3. Kết nối VNC Server
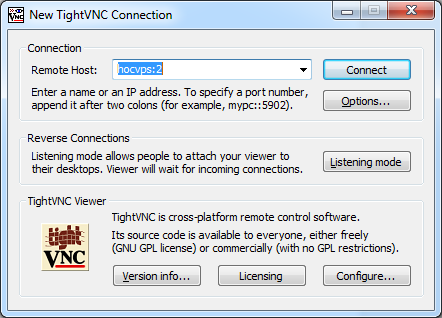
Bạn cài đặt TightVNC for Windows hoặc VNC Viewer của RealVNC (có hỗ trợ Mac) rồi chạy VNC Viewer để kết nối tới server với địa chỉ IP và port VNC đã cài đặt. Ví dụ domain:1 cho user root và domain:2 cho user hocvps
Tiếp theo cần nhập password cho VNC.
Nếu mọi việc thành công, giao diện GUI sẽ hiện ra như bên dưới:

Chúc bạn thành công!
Nguồn: http://hocvps.com/cai-dat-vnc-server-tren-centos/